Abbiamo visto in uno dei post precedenti come utilizzare delle reti neurali convoluzionali per effettuare il riconoscimento vocale di semplici numeri da zero a nove.
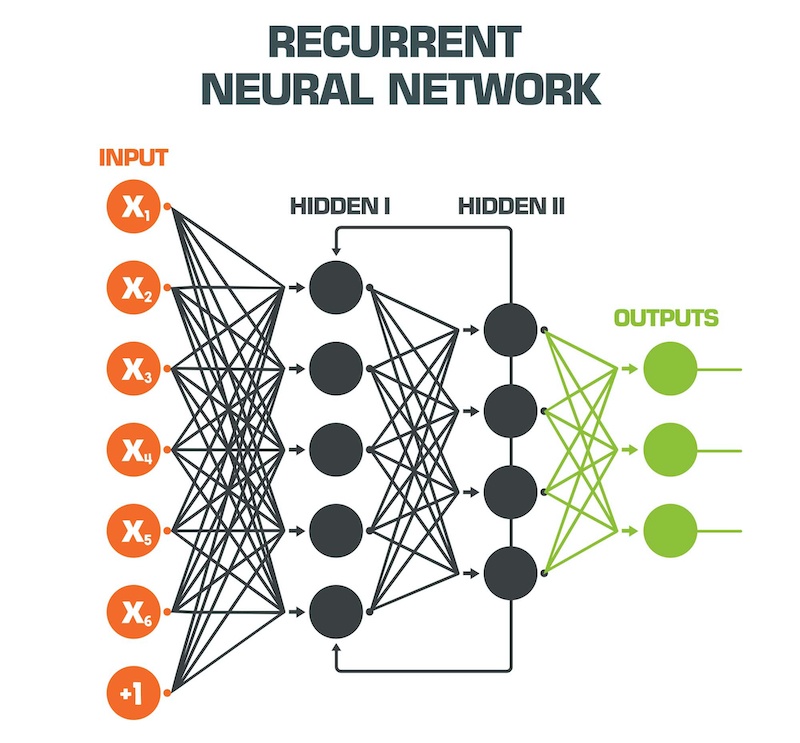
Nella pratica il riconoscimento vocale presenta performance superiori adottando delle particolari reti neurali denominate Recurrent Neural Network, ovvero “Reti Neurali Ricorrenti” (RNN per semplicità).
A differenza delle reti neurali feed-forward “semplici”, le RNN elaborano come input sia i dati effettivamente forniti come tali, sia alcuni dei dati di output in maniera retroattiva. Questo consente loro di lavorare “con memoria“.
Tra le reti neurali ricorrenti RNN che offrono migliori performance quando desideriamo effettuare predizioni che richiedono memoria, ovvero tengano conto della sequenza dei dati in ingresso precedenti, si annoverano la tipologia denominata LSTM, ovvero Long short-term memory. Esse hanno la proprietà di andare a predire i nostri output tenendo conto di dati anche molto antecedenti, ovvero potremmo dire che “hanno la memoria lunga“.
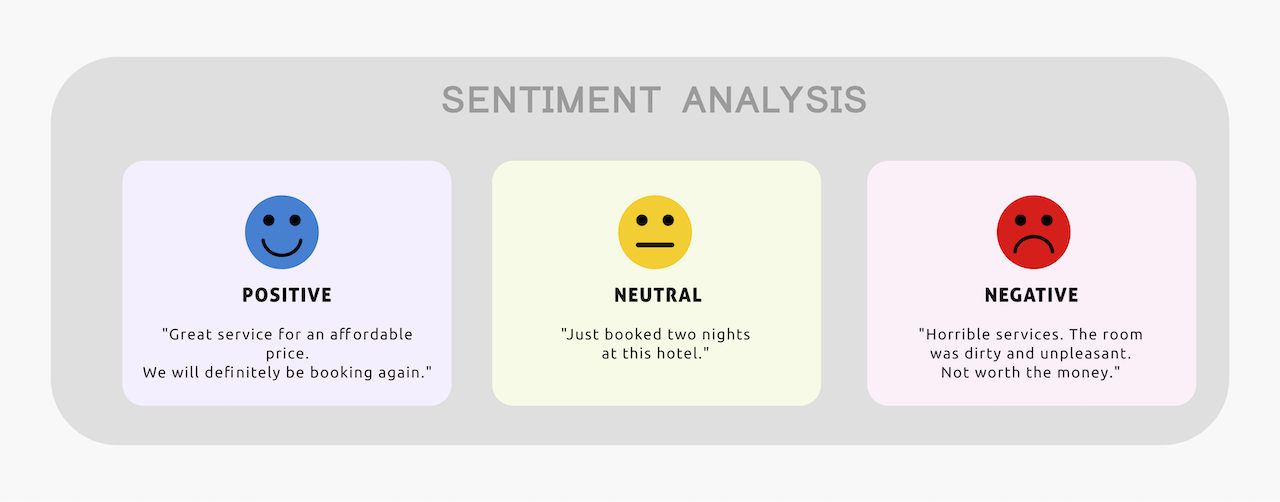
Nel seguente post, utilizzeremo proprio le LSTM per andare a effettuare un analisi del Sentiment su alcuni dati. In particolare importeremo un dataset pubblico di recensioni di 25.000 film, disponibile per effettuare il training e la validation del nostro modello di machine learning con design di rete neurale che utilizzi metodologie LSTM.
Importiamo le librerie necessarie, tra cui tutta la suite Keras per progettare e addestrare la nostra rete neurale ricorrente:
import pandas as pd
from sklearn.model_selection import train_test_split
import pickle
import matplotlib.pyplot as plt
import matplotlib.ticker as ticker
from IPython.display import HTML
import numpy as np
from sklearn import preprocessing
from keras.datasets import imdb
from keras.models import Sequential
from keras.preprocessing.sequence import pad_sequences
from keras.layers import Embedding, GlobalAveragePooling1D, Dense, SpatialDropout1D, LSTM, Dropout
from keras.optimizers import SGD
from keras.preprocessing.text import Tokenizer
from keras.utils import to_categorical
Impostiamo il numero massimo di parole che utilizzeremo nel nostro dizionario e la lunghezza massima di ogni recensione:
# Define max dictionary words and max lenght of each review
num_words = 12000
max_phrase_len = 256
Importiamo il dataset IMDB fornito da Keras:
# Import the IMDB movie reviews
(X_train, y_train), (X_test, y_test) = imdb.load_data(num_words=num_words)
# Display number of training and testing data
print(“Training entries: {}, labels: {}”.format(len(X_train), len(y_train)))
Maggiori informazioni sul dataset IMDB sono disponibili sul sito ufficiale:
https://keras.io/api/datasets/imdb/
Come descritto, il dataset contiene 25.000 recensioni di vari film in lingua inglese. Ogni parola della recensione è già stata convertita in un numero intero. Per comodità tale conversione è avvenuta utilizzando la frequenza di occorrenza della parola stessa all’interno del dataset: ad esempio, la parola “worst” è convertita con il numero 249 proprio perchè compare 249 volte nel dataset in esame.
Questo processo (come vedremo più avanti) ci risparmia una fase – altrimenti indispensabile – di tokenizzazione del testo.
Inseriamo un offset pari a 3 per poter aggiungere e associare i valori 0,1,2,3 rispettivamente alla label PAD (utile per “riempire” le recensioni di lunghezza inferiore a 256), START, UNKNOWN, UNUSED:
INDEX_FROM=3
word_to_id = imdb.get_word_index()
word_to_id = {k:(v+INDEX_FROM) for k,v in word_to_id.items()}
word_to_id[“<PAD>”] = 0
word_to_id[“<START>”] = 1
word_to_id[“<UNK>”] = 2
word_to_id[“<UNUSED>”] = 3
id_to_word = {value:key for key,value in word_to_id.items()}
Visualizziamo un esempio di recensione positiva (la prima delle recensioni del set di training) sia in formato numerico, che testuale:
# Positive review example
print(X_train[0])
print(‘ ‘.join(id_to_word[id] for id in X_train[0] ))
[1, 14, 22, 16, 43, 530, 973, 1622, 1385, 65, 458, 4468, 66, 3941, 4, 173, 36, 256, 5, 25, 100, 43, 838, 112, 50, 670, 2, 9, 35, 480, 284, 5, 150, 4, 172, 112, 167, 2, 336, 385, 39, 4, 172, 4536, 1111, 17, 546, 38, 13, 447, 4, 192, 50, 16, 6, 147, 2025, 19, 14, 22, 4, 1920, 4613, 469, 4, 22, 71, 87, 12, 16, 43, 530, 38, 76, 15, 13, 1247, 4, 22, 17, 515, 17, 12, 16, 626, 18, 2, 5, 62, 386, 12, 8, 316, 8, 106, 5, 4, 2223, 5244, 16, 480, 66, 3785, 33, 4, 130, 12, 16, 38, 619, 5, 25, 124, 51, 36, 135, 48, 25, 1415, 33, 6, 22, 12, 215, 28, 77, 52, 5, 14, 407, 16, 82, 10311, 8, 4, 107, 117, 5952, 15, 256, 4, 2, 7, 3766, 5, 723, 36, 71, 43, 530, 476, 26, 400, 317, 46, 7, 4, 2, 1029, 13, 104, 88, 4, 381, 15, 297, 98, 32, 2071, 56, 26, 141, 6, 194, 7486, 18, 4, 226, 22, 21, 134, 476, 26, 480, 5, 144, 30, 5535, 18, 51, 36, 28, 224, 92, 25, 104, 4, 226, 65, 16, 38, 1334, 88, 12, 16, 283, 5, 16, 4472, 113, 103, 32, 15, 16, 5345, 19, 178, 32]
<START> this film was just brilliant casting location scenery story direction everyone's really suited the part they played and you could just imagine being there robert <UNK> is an amazing actor and now the same being director <UNK> father came from the same scottish island as myself so i loved the fact there was a real connection with this film the witty remarks throughout the film were great it was just brilliant so much that i bought the film as soon as it was released for <UNK> and would recommend it to everyone to watch and the fly fishing was amazing really cried at the end it was so sad and you know what they say if you cry at a film it must have been good and this definitely was also congratulations to the two little boy's that played the <UNK> of norman and paul they were just brilliant children are often left out of the <UNK> list i think because the stars that play them all grown up are such a big profile for the whole film but these children are amazing and should be praised for what they have done don't you think the whole story was so lovely because it was true and was someone's life after all that was shared with us all
Essendo positiva il valore della target label sarà pari a 1:
# Display the target label
# 0 = negative, 1 = positive
print(y_train[0])
Result: 1
La seconda recensione nei dati di training è invece negativa: potete ripetere le istruzioni precedenti con X_train[1] e y_train[1] e otterrete un risultato pari a zero.
Inseriamo la label PAD per allineare la lunghezza di tutte le recensioni a 256, usando la funzione pad_sequences fornita da Keras:
#Align the lenght of each training and test review to 256 by adding PAD words
X_train = pad_sequences(
X_train,
value=word_to_id[“”],
padding=’post’,
maxlen=max_phrase_len
)
X_test = pad_sequences(
X_test,
value=word_to_id[“”],
padding=’post’,
maxlen=max_phrase_len
)
Stampiamo una recensione, ad esempio la seconda, per visualizzare i PAD inseriti:
#Display the result after the Padding process (words)
print(‘ ‘.join(id_to_word[id] for id in X_train[1] ))
<START> big hair big boobs bad music and a giant safety pin these are the words to best describe this terrible movie i love cheesy horror movies and i've seen hundreds but this had got to be on of the worst ever made the plot is paper thin and ridiculous the acting is an abomination the script is completely laughable the best is the end showdown with the cop and how he worked out who the killer is it's just so damn terribly written the clothes are sickening and funny in equal measures the hair is big lots of boobs bounce men wear those cut <UNK> shirts that show off their <UNK> sickening that men actually wore them and the music is just <UNK> trash that plays over and over again in almost every scene there is trashy music boobs and <UNK> taking away bodies and the gym still doesn't close for <UNK> all joking aside this is a truly bad film whose only charm is to look back on the disaster that was the 80's and have a good old laugh at how bad everything was back then <PAD> <PAD> <PAD> <PAD> <PAD> <PAD> <PAD> <PAD> <PAD> <PAD> <PAD> <PAD> <PAD> <PAD> <PAD> <PAD> <PAD> <PAD> <PAD> <PAD> <PAD> <PAD> <PAD> <PAD> <PAD> <PAD> <PAD> <PAD> <PAD> <PAD> <PAD> <PAD> <PAD> <PAD> <PAD> <PAD> <PAD> <PAD> <PAD> <PAD> <PAD> <PAD> <PAD> <PAD> <PAD> <PAD> <PAD> <PAD> <PAD> <PAD> <PAD> <PAD> <PAD> <PAD> <PAD> <PAD> <PAD> <PAD> <PAD> <PAD> <PAD> <PAD> <PAD> <PAD> <PAD> <PAD> <PAD>
Ora che abbiamo tutte le recensioni di uguale lunghezza, abbiamo la necessità di trasformare ogni parola dal numero intero associato a una serie di feature più adeguate per essere fornite in input al nostro modello di machine learning basato su reti neurali. Infatti, se gli fornissimo in pasto i numeri interi così come sono, il modello sarebbe soggetto sicuramente a elevati bias perché assocerebbe i numeri a delle quantità ordinali, senza minimamente tenere conto del loro significato testuale e correlazioni di varia natura.
Per fare questo Keras mette a disposizione una funzionalità chiamata Embedding, che consente di trasformare ogni parola (numero intero) in un vettore multidimensionale che acquisisce significato: per semplificare, possiamo pensare che più due parole sono correlate tra di loro, più la funzione di embedding le assocerà a due vettori “vicini” tra di loro.
Proviamo a stampare su un grafico i vettori relativi al nostro dataset, usando una funzione di embedding più semplice possibile, ovvero a due dimensioni.
# Evaluate the Embedding operation
model = Sequential()
model.add(Embedding(input_dim=num_words, output_dim=2, input_length=256))
textvector = model.layers[0].get_weights()[0]
# Display the 2D map of word vectorization after the embedding process
x_vect = textvector[:,0]
y_vect = textvector[:,1]
fig = plt.figure()
fig.subplots_adjust(top=3.8, right = 1.9)
ax1 = fig.add_subplot(211)
plt.scatter(x_vect, y_vect, alpha=0.2,c=’pink’) # Plot the vectorized words
plt.scatter(x_vect[2], y_vect[2], alpha=1.0,c=’blue’) # Plot vector for word in position 2
plt.scatter(x_vect[3], y_vect[3], alpha=1.0,c=’blue’) # Plot vector for word in position 2
plt.title(“Word Vectorization”, fontsize=20)
plt.xlabel(“X vector value”, fontsize=20)
plt.ylabel(“Y vector value”, fontsize=20)
Ecco il risultato:
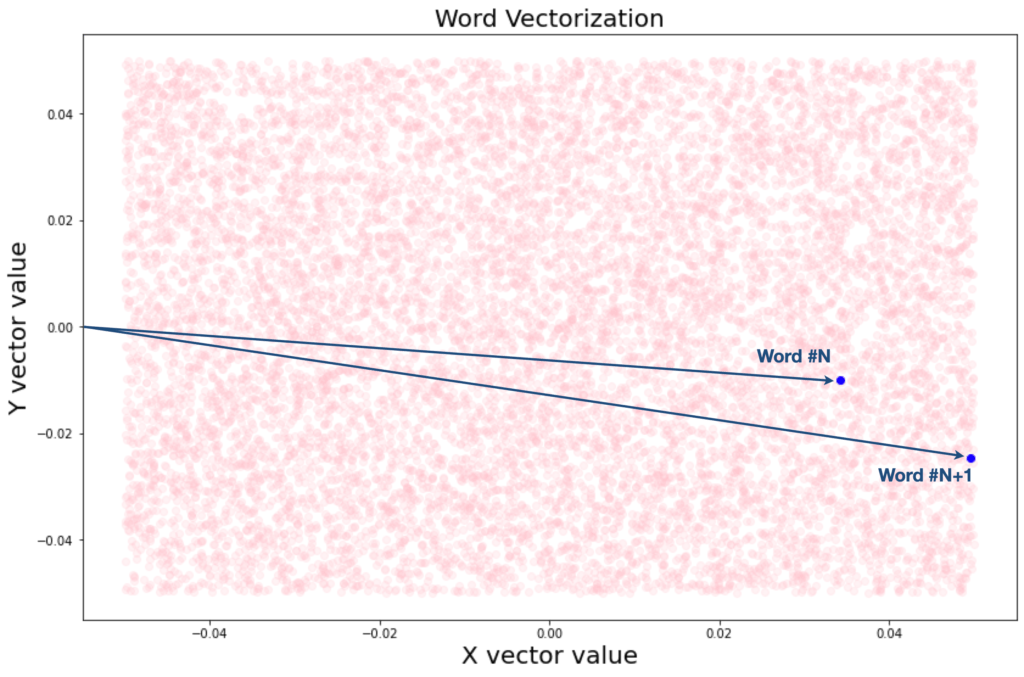
Nella pratica, utilizzeremo uno spazio vettoriale a 32 dimensioni nell’embedding relativo alla rete neurale di produzione.
E’ giunto il momento di “disegnare” la nostra rete neurale ricorrente con Keras. Facciamolo!
# Create the RNN Neural Network
model_lstm = Sequential()
model_lstm.add(Embedding(input_dim = num_words, output_dim = 32, input_length = max_phrase_len))
model_lstm.add(SpatialDropout1D(0.1))
model_lstm.add(LSTM(32, dropout = 0.2, recurrent_dropout = 0.2,return_sequences=True))
model_lstm.add(LSTM(32))
model_lstm.add(Dense(128, activation = ‘relu’))
model_lstm.add(Dropout(0.3))
model_lstm.add(Dense(2, activation = ‘softmax’))
model_lstm.summary()
La nostra rete è quindi costituita da un livello di input che si occupa di implementare la vettorializzazione tramite embedding a 32 dimensioni, producendo quindi 32 feature per ogni recensione, un secondo livello di rete ricorrente LSTM con memoria lunga (return_sequences=True) e un terzo con memoria più limitata (entrambi a 32 nodi).

Seguono poi un quarto livello di rete neurale fully-connected a 128 nodi e un livello di output che ci fornirà due valori: la probabilità che la recensione sia positiva (1) o negativa (0).
Ovviamente sono state applicate anche alcune funzioni di dimensionality reduction, attraverso dei dropout di varia intensità, per affinare il modello.
Compiliamo il modello:
#Compile the RNN model
model_lstm.compile(
loss=’sparse_categorical_crossentropy’,
optimizer=’Adam’,
metrics=[‘accuracy’]
)
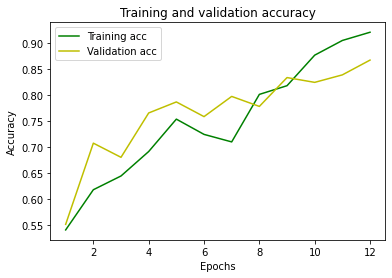
…E fittiamo il modello passandogli come input i dati di training, impostando il 20% (ovvero 5000 dei 25000 totali) come dati di validation:
#Fit our model
history = model_lstm.fit(
X_train,
y_train,
validation_split = 0.2,
epochs = 12,
batch_size = 64
)
Train on 20000 samples, validate on 5000 samples
Epoch 1/12
20000/20000 [==============================] - 71s 4ms/step - loss: 0.6805 - accuracy: 0.5403 - val_loss: 0.6884 - val_accuracy: 0.5510
Epoch 2/12
20000/20000 [==============================] - 61s 3ms/step - loss: 0.6208 - accuracy: 0.6175 - val_loss: 0.5627 - val_accuracy: 0.7070
Epoch 3/12
20000/20000 [==============================] - 60s 3ms/step - loss: 0.6203 - accuracy: 0.6439 - val_loss: 0.6120 - val_accuracy: 0.6798
Epoch 4/12
20000/20000 [==============================] - 60s 3ms/step - loss: 0.5992 - accuracy: 0.6909 - val_loss: 0.5273 - val_accuracy: 0.7650
Epoch 5/12
20000/20000 [==============================] - 60s 3ms/step - loss: 0.5365 - accuracy: 0.7531 - val_loss: 0.4927 - val_accuracy: 0.7862
Epoch 6/12
20000/20000 [==============================] - 60s 3ms/step - loss: 0.5476 - accuracy: 0.7239 - val_loss: 0.5130 - val_accuracy: 0.7580
Epoch 7/12
20000/20000 [==============================] - 60s 3ms/step - loss: 0.5413 - accuracy: 0.7094 - val_loss: 0.4968 - val_accuracy: 0.7968
Epoch 8/12
20000/20000 [==============================] - 60s 3ms/step - loss: 0.4601 - accuracy: 0.8007 - val_loss: 0.4716 - val_accuracy: 0.7776
Epoch 9/12
20000/20000 [==============================] - 60s 3ms/step - loss: 0.4069 - accuracy: 0.8174 - val_loss: 0.3909 - val_accuracy: 0.8330
Epoch 10/12
20000/20000 [==============================] - 59s 3ms/step - loss: 0.3090 - accuracy: 0.8760 - val_loss: 0.4457 - val_accuracy: 0.8238
Epoch 11/12
20000/20000 [==============================] - 59s 3ms/step - loss: 0.2494 - accuracy: 0.9043 - val_loss: 0.4001 - val_accuracy: 0.8382
Epoch 12/12
20000/20000 [==============================] - 60s 3ms/step - loss: 0.2122 - accuracy: 0.9201 - val_loss: 0.3602 - val_accuracy: 0.8666
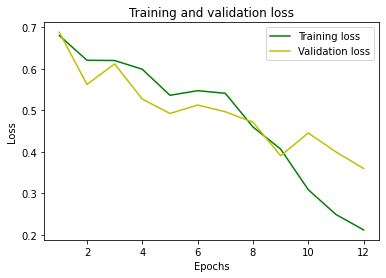
Stampiamo i grafici di loss e accuratezza, all’aumentare delle ripetizioni (epochs):
#Plot the Loss
plt.clf()
loss = history.history[‘loss’]
val_loss = history.history[‘val_loss’]
epochs = range(1, len(loss) + 1)
plt.plot(epochs, loss, ‘g’, label=’Training loss’)
plt.plot(epochs, val_loss, ‘y’, label=’Validation loss’)
plt.title(‘Training and validation loss’)
plt.xlabel(‘Epochs’)
plt.ylabel(‘Loss’)
plt.legend()
plt.show()
Plot the accuracy
plt.clf()
acc = history.history[‘accuracy’]
val_acc = history.history[‘val_accuracy’]
plt.plot(epochs, acc, ‘g’, label=’Training acc’)
plt.plot(epochs, val_acc, ‘y’, label=’Validation acc’)
plt.title(‘Training and validation accuracy’)
plt.xlabel(‘Epochs’)
plt.ylabel(‘Accuracy’)
plt.legend()
plt.show()
Salviamo il modello così ottenuto su disco per utilizzarlo in produzione durante le future fasi di inferenza.
#save the model to disk
filename = ‘finalized_model_sentiment.sav’
pickle.dump(model, open(filename, ‘wb’))
Abbiamo ottenuto un’accuratezza piuttosto elevata.
E’ giunto il momento della verità: proviamo a effettuare la predizione su alcuni dati di test e verifichiamo se risulta adeguata o meno!
Utilizziamo, ad esempio, una recensione che sappiamo essere positiva (nel dataset di test):
#Display the review to be predicted
#0=Negative
#1=Positive
review_index = 2
y_test[review_index]
Result = 1
Effettuiamo la predizione utilizzando il modello di apprendimento costruito in precedenza:
#Sentiment Prediction
#Make the inference by using the fitted RNN model
pred = model_lstm.predict(X_test[review_index].reshape(-1,256))
print(“\n\033[1mPredicted sentiment [0=Negative – 1=Positive]: %.0f”%pred.argmax(),”\033[0m \n “)
print(“Predicted probability array:”)
print(pred)
Risultato:
Predicted sentiment [0=Negative - 1=Positive]: 1

Predicted probability array:
[[0.00472206 0.995278  ]]
Il modello ha previsto che la recensione in esame è positiva con il 99,5278% di probabilità… Ottimo risultato!
Volete approfondire meglio questi argomenti?
Ecco una lettura interessante su Machine Learning e AI.
